You can also make narration videos on Chromebook! Explain the kitchen and video functions-window du
 notebook-laptop
Chromebook's simple and skillful skills
The second time, the second time
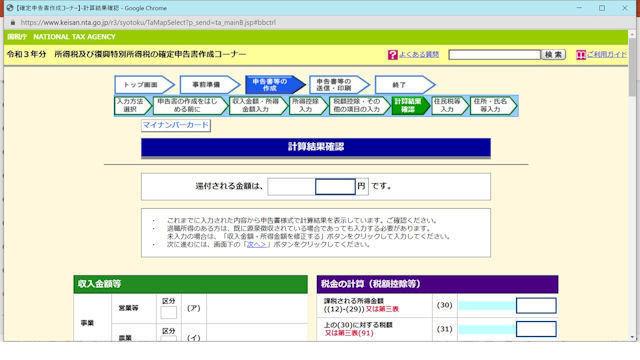
「Chrome OS」のスクリーンショット機能
4回にわたってChromebookとそのOS「Chrome OS」の使いこなしを解説する本特集。The second time, the second timeとなる今回は、「Chrome OS」でスクリーンショットを撮影する方法を詳説する。デスクトップ画面の様子を撮影し、画像ファイルとして保存するスクリーンショット機能は、面白いシーンやお気に入りの場面を残しておきたいだけではなく、エラーや不具合に遭遇したり、使い方がわからないので詳しい人に聞きたい場合にも役立つ。最近の「Chrome OS」にはスクリーンショットを動画として記録する機能も追加されているので、実況動画を作成することも可能だ。併せて活用したい。
Take screenshots with keyboard shortcuts
If the Chromebook comes with a keyboard, then the [Ctrl] + [display window] key is the easiest. Take a screenshot of the entire desktop, and a notification is displayed in the lower right corner of the desktop.
[Ctrl]+[ウィンドウを表示]キーでデスクトップ全体のスクリーンショットを撮影(公式ドキュメント「Chromebook の使い方」より)デスクトップ右下に通知が表示される
If you want to photograph part of the desktop or a specific window instead of the entire desktop, press the [Ctrl] + [Shift] + [Show window] key. Then the capture (shooting) tool will be displayed on the desktop. Even if the [Shift] key becomes the [Alt] key, it's almost the same operation.
[Ctrl]+[Shift]+[ウィンドウを表示]キーでデスクトップの一部や特定のウィンドウを撮影(公式ドキュメント「Chromebook の使い方」より)デスクトップにキャプチャーツールが表示されるThe command bar of the snap tool has the following functions from left to right.
If you want to stop snapping, press the [close] button on the command bar. If you are using a keyboard, you can use the [Esc] key.
Take screenshots with mouse touch
If the Chromebook does not have a keyboard to remove the keyboard, the capture tool can also be started through mouse and touch operations. Click the status area at the right end of the shelf (the area that displays the clock, etc.), access the Quick setup menu, and click the [screen capture] command (circle icon surrounded by -).
シェルフ右端のステータス領域をタップしてクイック設定メニューへアクセスし、[スクリーン キャプチャー]コマンドをタップRecord the picture.
To record a desktop screen, switch the capture tool to recording mode. Like the screenshot, you can select three photographic objects in the overall selection window of the desktop.
When the selection of subjects is complete, shooting begins after a 3-second countdown. To stop recording, simply click the stop icon that appears on the shelf.
シェルフ右端のステータス領域をタップしてクイック設定メニューへアクセスし、[スクリーン キャプチャー]コマンドをタップWhere will the filmed and recorded data be saved?
After the shooting and video recording is completed, a notice appears in the lower right corner of the desktop, which can confirm, edit and delete the screenshot (mentioned above). At this time, as the screenshot is also automatically copied to the clipboard, as long as it is "Twitter", "Gmail", "beautiful blog" and other Web services corresponding to the paste of the clipboard, you can paste and use the screenshot directly.
撮影したスクリーンショットはクリップボードにコピーされる。「ファイル」アプリの指定フォルダーで閲覧することも可能The storage address of the filmed and recorded data is as follows. Slide the shelf up to open the emitter, find and start the Files application. Data should be stored when accessing a given folder from the side panel.
In addition, it can also be used from the my Files-download folder. If it is after "Chrome OS89", you can also access the most recent screenshot from the "Toto" set on the shelf. You can easily view files without opening the Files application.
最新の「Chrome OS」ならば「トート」にもスクリーンショットが格納されるサムネイルの右クリックメニューで追加のコマンドが利用可能