5 Recommended Backup Methods for iPhone Explaining the Optimal Procedures for Each Environment such as iCloud and iTunes | TIME & SPACE by KDDI
The iPhone contains a wide variety of data, including photos and videos, website favorites, and app save data. For that reason, if you do not make frequent backups, you may lose important data together in the event of an unexpected situation such as failure or loss. Above all, if you make a backup on a regular basis, data migration will be smooth even when changing models.
However, there are many ways to back up, and many people may be wondering which one to choose. Therefore, in this article, we will explain the advantages and disadvantages of typical iPhone backup methods and the specific procedure.
There are two main ways to back up your iPhone. One is to use the cloud to store data on an internet server. The other is to save the data to an external device such as a PC or SD card.
Let me introduce the general differences and advantages / disadvantages of each.
・ Data can be accessed anytime and anywhere as long as the terminal can connect online.・ If you use iCloud, you can save detailed data such as contacts, email history, downloaded apps, and various settings in addition to photos, videos, music, and documents. -Cloud services of other companies also support major files such as photos and videos. -Depending on the service, there is also a function that can automatically save iPhone data at regular intervals.
-If there is a problem with the Internet connection, data access may be hindered or download may take a long time. -Depending on the communication environment and speed limit on the service side, it may take several hours to save a large amount of data.・ In many cases, the upper limit of the free plan is around 5GB, so if you want to save all the data in the iPhone including photos and videos, you need to subscribe to the paid plan.・ There is a risk of losing data due to service termination or cyber attacks. Check if there is a recovery service.
-Can be used regardless of the Internet connection.・ The only cost required is the price of the equipment. In some cases, it is cheaper than the total cost of monthly billing in the cloud. -For PCs, iTunes can be used to save detailed data such as photos, videos, music, documents, contacts, email history, downloaded apps, and various settings. -The SD card also supports major files such as photos and videos.
-Data cannot be accessed unless the external device itself is at hand. -There is a risk of losing data due to loss, damage, life, deterioration over time, etc. Check if there is a guarantee from the manufacturer or the store where you purchased the product. -Since there is no automatic save function, it is necessary to manage the backup timing by yourself and perform the work manually.
From here, I will introduce a specific iPhone backup method. First of all, when using the cloud, there are three typical methods.
1. Take a backup with iCloud 2. Take a backup with a cloud service such as Dropbox 3. Take a backup with au's "Data Storage"
Let's take a look at each backup item, its advantages and disadvantages, and the actual procedure.
One of the most common methods is to use iCloud for backup. You can back up almost all the data and settings stored on your iPhone. The corresponding data is as follows.
・ Photos and videos ・ Purchase history of Apple services (music, movies, TV programs, applications, books, etc.) ・ iMessage, SMS, MMS messages ・ Device settings ・ App data ・ Home screen and App layout ・ Contacts ・ Calendar ・Wallpapers, ringtones and notification sounds, incoming / outgoing call history, Visual Voicemail passwords, etc.
The biggest advantage of backing up with iCloud is that you can save not only photos and videos but also iPhone setting information. Even if your iPhone needs to be initialized due to a malfunction or loss, you can restore it to the state you were using by restoring it with iCloud. The data you want to back up can be easily specified from the "Settings" app, so the operation is easy.
Many people don't have a PC these days, so it would be an advantage to complete the backup with the iPhone alone. On the contrary, for those who use multiple terminals properly, it is a nice point to be able to share videos and photos smoothly. Data stored in iCloud will be easily accessible from iOS devices such as iPads and Macs.
Not surprisingly, the backup history feature is also useful. This is a function that allows you to save the previous backup file as a separate backup file instead of overwriting it as it is when backing up with iCloud. Since you can keep the latest 3 backups, it is useful for restoration in case of emergency, such as when you have backed up with important data deleted.
Also useful is the automatic save function, which backs up your data on a regular basis. However, when using this function, the condition is that the iPhone is connected to the power supply, connected to Wi-Fi, locked, and there is free space in iCloud. Become.
The disadvantage of iCloud is that the free storage capacity is 5GB. It's large enough for a free plan, but it may seem unsatisfactory for those who often take photos and videos. If you want to back up your photos and videos differently, or save all your iPhone data, you'll need to subscribe to a paid plan of 50GB or more.
From here, I will introduce the procedure to actually back up with iCloud.
Open the "Settings" app and tap [User name] ▶ [iCloud].
Tap iCloud Backup to turn it on.
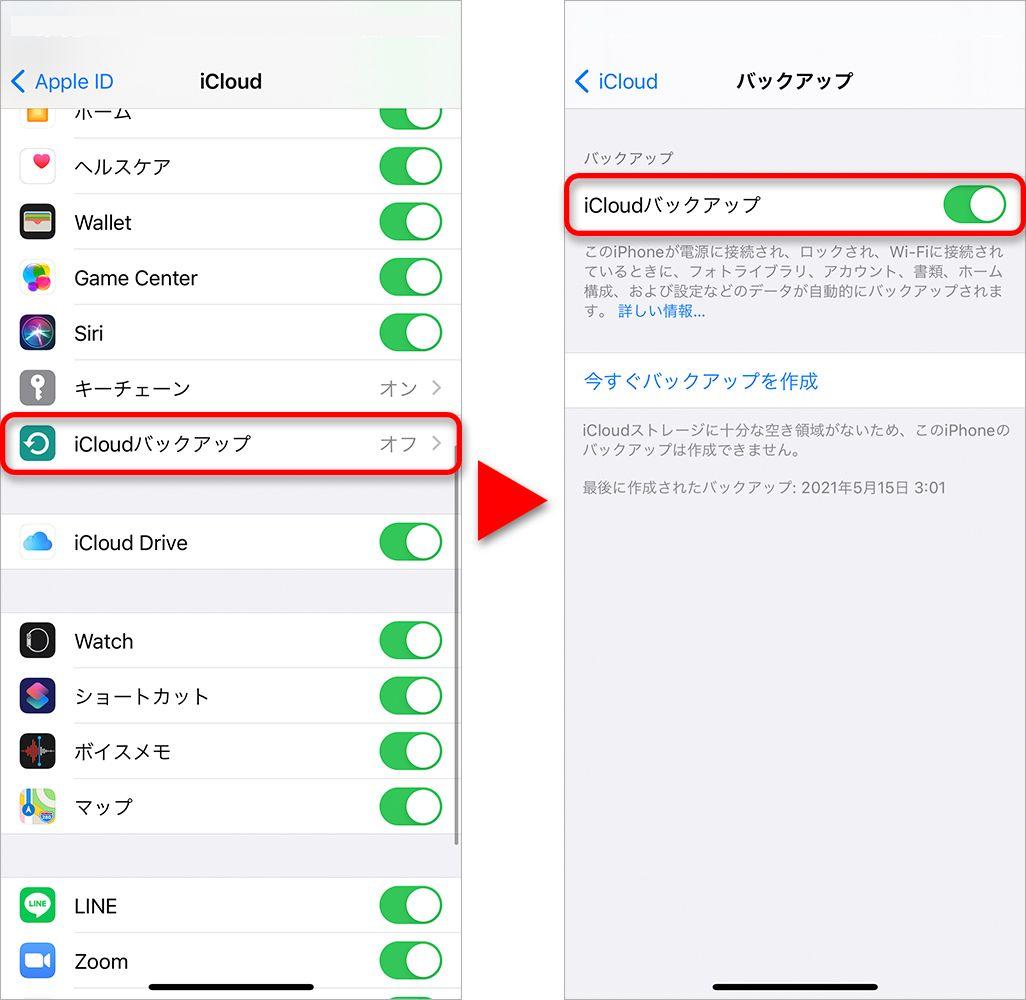
Tap [Create Backup Now]. The backup will start to be created, so wait according to the remaining time.
You can also back up with a cloud service such as Dropbox or Amazon Drive. The range that can be saved varies depending on the service, but basically it targets photos, videos, music, document files, etc. In many cases, application data and setting information are not supported.
For example, in the case of Dropbox, which is one of the typical cloud services, the corresponding data is as follows.
・ Photos and videos ・ Music ・ Word, Excel, PowerPoint ・ PDF ・ LINE talk ・ Other various files, etc.
The big advantage of using such a cloud service is that it can be used in combination with another backup method.
For example, you can use iCloud or iTunes as your main backup tool and use cloud services as a sub. With iCloud's free plan, it's difficult to store all the data on your iPhone, and iTunes requires you to connect to your PC and secure free space. Therefore, iCloud and iTunes store data that is only compatible with them, and photos and videos are stored in cloud services.
Also, unlike iCloud, which is linked to your account, you can share the data stored in the cloud service with other people. It can be useful in a variety of situations, from when you want to share data with colleagues and business partners at work, to when you want to share photos with friends.
The disadvantage is that there are cases where the free plan has a small storage capacity. For Dropbox, for example, the free plan has a capacity of 2GB, which is unfortunate for storing photos and videos. If you want to store a large amount of data, you need to subscribe to a 1TB paid plan.
Here, as an example, we will introduce the procedure for backing up with Dropbox. The procedure is different only when saving the LINE talk history, so let's check each one.
Launch the "Dropbox" app and tap [Create]. Select [Upload photos] if you want to save photos and videos, or [Create / upload files] if you want to save other files.
Select the file you want to save and tap [Next]. Select the upload destination folder and tap [Upload].
Tap the menu at the top right of the LINE talk screen, and select [Other] on the displayed screen.
Tap [Send Talk History], then tap [Save to Dropbox].
If you are an au user, one option is the "data storage" service, which allows you to upload and download data to an au server. The corresponding data is as follows.
・ Photos and videos ・ au mail, SMS, + message ・ Device settings ・ App list ・ Home screen and App layout ・ Contacts ・ Calendar ・ Wallpaper ・ Ringtone and notification sound ・ Call history ・ Password information etc.
If you are an au user, there are many advantages to using data storage. Not only can you easily operate from the app using your au ID, but you can also save detailed data such as setting information, so there is no need to reset it when restoring.
The storage capacity is 1GB, but if you subscribe to the paid membership service "au Smart Pass" (*) or "au Smart Pass Premium", the upper limit will be increased to 50GB. The monthly fee for au Smart Pass is 372 yen, and the monthly fee for au Smart Pass Premium is 499 yen. It also offers a full range of services such as compensation when a smartphone breaks down, discount coupons, and watching videos and music. * "Au Smart Pass" will no longer accept new subscriptions on October 1, 2020.
Even with these benefits, data storage is much cheaper than iCloud and other cloud services when compared with 50GB of storage capacity. Also, it can be said that it is a big merit that the storage capacity can be expanded for 100 yen for every 10 GB.
The disadvantage is that you can only upload videos up to 300MB per file. Also, please note that password information can only be backed up on iOS 9 or higher devices equipped with Touch ID or Face ID.
From here, we will introduce the procedure for backing up with au "Data Storage".
Launch the "Data Storage" app and tap [Start using]. au ID login is completed, so tap [OK].
Tap [OK] or [Allow] for various access rights. Since the home screen is displayed, tap [Deposit], check the data you want to save, and tap [Deposit].
Since the screen is being saved, wait as it is, and tap [Finish] when [We have received the following data] is displayed.
Next, I will show you how to make a backup with an external device. There are two typical methods.
・ Back up with PC ・ Back up with SD card
Let's take a look at each backup item, its advantages and disadvantages, and the actual procedure.
If you want to back up with an external device, the PC is the most familiar option. The most common method is to use iTunes, which can store almost all data on the iPhone. On Macs running macOS Catalina 10.15 or later, use the Finder instead of iTunes.
The corresponding data is as follows.
・ Photos and videos ・ Purchase history of Apple services (music, movies, TV programs, applications, books, etc.) ・ iMessage, SMS, MMS messages ・ Device settings ・ App data ・ Home screen and App layout ・ Contacts ・ Calendar ・Wallpapers, ringtones and notification sounds, incoming / outgoing call history, Visual Voicemail passwords, etc.
The advantage of backing up on a PC is that it uses the storage capacity of the PC, so it has a larger capacity than the free plan in the cloud. However, please note that if there is not enough free space on your PC, you may not be able to save enough data.
Also, for those who are accustomed to using PCs for work etc., backup can be taken smoothly, which can be said to be one of the merits.
The disadvantage of backing up on a PC is that the data will be lost due to damage or loss of the PC itself. In addition, the operation of the PC may become slow or take a long time while the data is being saved. If you want to back up on your PC, you want to do it when you have a lot of time.
Here, we will introduce the procedure for backing up each of Mac (macOS Catalina 10.15 or later) and Windows PC (Windows 10 Home) as an example. If you're using a previous version of macOS, you can use iTunes to back up your iPhone.
Connect your iPhone and Mac with a cable and select your iPhone (your own name) in the Mac Finder sidebar.
Click General on the tab at the top and select Back up all data on iPhone to this Mac. To encrypt the backup data and password protect it, select Encrypt local backup and click Backup Now.
If you've set up Wi-Fi sync, you can also connect your iPhone to your Mac wirelessly without using a cable.
Depending on the settings of your PC, iTunes will start as soon as you connect your iPhone, but if the iTunes auto sync setting is turned on at that time, iPhone sync will start forcibly. This may cause data to be lost or duplicated, so it is recommended to turn off the automatic synchronization setting in advance.
Before connecting the iPhone with a cable, start "iTunes" on the PC and click [iTunes] ▶ [Edit] ▶ [Preferences]. [Device Preferences] will open. Select [Devices], check [Do not sync iPod, iPhone, and iPad automatically], and click [OK].
Connect your iPhone and PC with a cable and click [iPhone Mark] at the top left of the iTunes screen.
Click Backup Now on the Overview tab to start the backup. If you want to encrypt the backup, click [Encrypt local backup]. Enter the password and select [Set Password].
It is also possible to take a backup by transferring the data to the SD card. The corresponding data is as follows.
・ Photos and videos ・ Music ・ Word, Excel, PowerPoint ・ PDF ・ Other files, etc.
The advantage of SD card is that you can save a lot of data by using a large capacity SD card or multiple SD cards. Larger ones may have up to 2TB of storage capacity.
Also, if you want to share data with multiple terminals, you can connect the SD card to another device, so it is very easy to use. You can create backups without using a PC, which is useful for people who do not have a PC or who want to carry it easily.
However, the iPhone does not have an SD card slot, so you will need to purchase an SD card reader separately. In addition, SD cards may reach the end of their life in about 2 to 3 years, so they are not always suitable for long-term storage. Take proper measures such as backing up important data twice. While using iCloud's automatic save function, it is also recommended to use it as an auxiliary method, such as transferring important data to the SD card just in case.
From here, I will introduce the procedure to back up with SD card.
Connect the SD card reader to your iPhone and insert the SD card. Open the file you want to save on the SD card and tap the [Share Button].
Tap [Save to file]. Select the SD card to save to and tap [Save].
Make sure to make a backup so that you can use your iPhone safely and securely. It's useful not only to protect your important data, but also to share photos, videos, business document data, etc. on multiple devices.
As a precaution in case of emergency, and as a technique to use your iPhone more conveniently, back up your data frequently.
 notebook-laptop